Mr.Fa

Minggu, 09 Maret 2014

Tips for Filling Out Job Applications Online

Tips for Filling Out Job Applications Online

Quick Question!
Have you encountered the following: You’re trying to find a job and come across a page that contains a company's job application form, job application questionnaire, or even a federal form, and you hate having to fill all the information every time?
The following article lists some simple, informative tips that will help you have a better experience with Filling Out Job Applications Online.
I found that applying for jobs online to be a hassle in itself, especially if you are trying to apply to multiple jobs at one time or multiple jobs in one day!  Have you ever tried to apply to 20-30 jobs in one day online? Well you may not consider everything you read to be crucial information about applying for jobs, but when it comes to filling out multiple job applications, don't be surprised if you find yourself recalling and using this very important information in the next few days.
Did you know that there is software out there for things like filling out job applications forms online?
It’s called RoboForm and it will offer to fill the information from your personal profile quickly and easily for you. A personal profile only needs to be set up once, and it allows you to fill any form with one click of a mouse.
About RoboForm Online
RoboForm is in my opinion the best and most user friendly software that stores login credentials, including usernames, passwords and login URLs, in encrypted files called Passcards. Each time the user wants to access his or her personal passwords or logins, RoboForm will automatically retrieve the appropriate Passcard data with just one simple click.
You can back up all you data with RoboForm Online, which ensures data security while making users’ critical login information and personal data instantly accessible where ever the user has access online from any computer. RoboForm has millions of active users worldwide and RoboForm also has been acclaimed by world recognized Bloomberg, PC World, Computer Shopper and CNET, among many others.
Save filled forms for repetitive applications.
You can save your particular form data to a Passcard and use the passcard later to fill in the saved data automatically whenever you decide too. Now if you’re a job seeker, then this becomes extremely useful with forms like federal forms or private company's job application forms that are designed for applying to multiple jobs online.
RoboForm will also memorizes the URL (web address) of the form that you filled. You can save all of your forms into Passcards and then use the GoFill toolbar command or GoTo in the Passcard Editor to:
• Navigate to the website
• Fill in the job form
• Press the submit button ...all in one click!
Global Online Availability.
With a RoboForm Online account, users can access and manage their login usernames, passwords and other essential information from any computer that has access to online, simply by logging into their online account. Your passwords are automatically kept in sync between multiple computers such as home and office PCs, or between PCs and notebooks. What’s more, since a person’s Passcards are kept in multiple locations (for example, each client computer as well as the RoboForm Online server) the user never needs to worry about losing their usernames and passwords again.
World-Class Safeguards and Security.
Weather you’re online or offline, RoboForm has state-of-the-art security. All Passcards and other stored information is protected using military grade AES encryption, with a key derived from the person’s Master Password. No users Master Passwords are stored anywhere on the RoboForm servers, ensuring that the user—and only the user—has access to, or knowledge of, the Master Password itself.
Adding to RoboForm users’ peace-of-mind RoboForm Online is the protection afforded to the service’s infrastructure. Servers are hosted at a highly secure facility with redundant power and connection systems. There backup equipment, firewalls and other safeguards infrastructure ensures guaranteed quality of availability of 99.99%, so you’re data is always safe and readily available.
RoboForm  Online is free for all RoboForm Users
RoboForm Online is available for free to all RoboForm users, so you can back up your data and have access to it from any computer in the world that has online access. To learn more about RoboForm or to sign up for RoboForm Online –Click Here!
Over the years, job seekers that have used RoboForm expressed a lot of positive feedback and if you or anyone you know is looking for a job, applying for jobs, uses different job search sites, or just simply fills out many forms or questionnaires; make sure to let them know about this article. RoboForm is the perfect tool to make your job search easier, especially if you are applying to multiple jobs, and it’s a great time saver as it lets you automatically log in various job sites, and fill out multiple job applications.
Hopefully the sections above have contributed to your ease of mind and new understanding for filling out many job applications online to make your job search much easier and more efficient. Share your new understanding about Tips for Filling Out Job Applications Online with your friends and family. They'll thank you for it.

SSS Online Inquiry: Check your SSS Contributions, Loans, Status, Applications Online and Text

Wanna check your SSS status, contributions and loans online or thru text? Now you can. I’ve listed the ways in this hub. I have registered myself as a member on their new online system and it's so easy. I've shared the steps in this page. Members of the SSS (Social Security System) in the Philippines can now check their membership information, status and updates through the SSS Online Inquiry System in the official website of the company. Everyone doesn’t need to go to any SSS office just to see and check their contributions or loan applications. SSS has improved their online inquiry to serve its members better and faster. Just log in and you can view your social security records conveniently. The recent great news is that we can now check our membership contributions, loan balance and applications via text. Yup, yup, so easy. Read on.
What are the features of the SSS Online Inquiry? The system was developed to serve all members for easy access of their membership and social security records, update their profile anytime, view status, contributions, and transactions. I have summed up the features below:
Update SSS Profile – you can update or change your latest address, contact number and email address. You can change password, too.
View Member’s Records – includes SSS number, date of birth, complete name, date of coverage, latest employer, employment history, actual premiums and contribution, benefits, premium payments, total number of contributions, total amount, loan status, eligibility to loans, loan availed status or loan application status, salary loan application, maternity notification, and submission of contribution collection list (H3).

How to check SSS Contributions, Loan Balance and Applications Online

How to use the SSS online Inquiry? If you wanna check your personal SSS records online including your contributions, loan balance, applications, benefits and more, you are required to register online and be approved. It’s easy and takes less than a minute. All you need to do is follow the steps and you’re in.

Step 1 Go to SSS Online Registration on this link.

Step 2 A window will appear. Tick the MEMBER for the type of user and ClickSUBMIT. (I recommend using Member than Employer so you have the control and access of your online SSS member’s info and records forever. Letting your employer register for you will cause complications in the future when you changed your company.

Step 3 Supply the accurate info and fill in the boxes. The requirements are your SS number, first name, last name, middle name, date of birth, and email address. Double check the data you have typed and enter the Captcha.

***Please be careful in typing your info. SS Number is composed of 10 digits only. Type it with no space or dash. Check your info and just click the submit button once you are hundred percent sure your details are correct. It is recommended your email address is on yahoo. If not, read the notes in red.

Step 4 Wait until the system display a message saying that an email has been sent to your email address. You have to open that email and go over the link they have sent you to continue your registration. Usually, SSS will email you after 2 or 3 days. Be patient and always check your email inbox.
Step 5 Open the link that SSS gave you in its email message. Then supply the data needed such as your:
  • Mother’s maiden name
  • Address
  • Contact Number
  • Preferred User ID (between 8-20 alphanumeric characters)
  • Savings account number / Check number (this is for retired pensioners)
  • SS Number (10-digit with no space or dash)
  • ***SBR No./OTC (For Self-employed, Voluntary member, OFW, Househelper, and Non-working spouse)
-If mode of payment is OTC or over-the-counter at SSS branch, type the 8-digitfollowing the T# (eg: T#15000075
-if you are paying at the bank, type the 6-digit SBR No. (Special Bank Receipt No.)
-If you’re paying through SM Bayad Center, Remittance Center or I-Remit, Western Union, type the 6-digit OTC Validation Number
-If you’re paying SSS by ADA (Auto-debit Arrangement) type 6 zeros (000000) in the SBR No./OTC box

this is the sample detail requirements for SSS REgistration Phase 2. The SSS Number, First name, last name, middle name and birthdate are already stored automatically
Step 6 Tick the box to accept and agree to the Terms and Conditions

Step 7 Wait for the SSS confirmation link sent on your email address. Once your registration was successful, you can then freely inquire online thru the SSS Online Inquiry via My.SSS.
After you have completed the Phase 2 in the registration, a message from SSS will appear like this below:
Easy, right? If you’ve got questions about the registration or problems with it, feel free to ask by leaving your comments below this article. Will be glad to help whenever I’m here.

Also read my other post about

How to View and Check SSS Contributions Online


SSS Text Inquiry

SSS text inquiry also known as Text SSS is now available to everyone. Now, we can get updates and information from our SSS contribution records, loan application status and loan balance. How to inquire your SSS via text? Follow the simple steps:
Step 1. Register. There are 2 ways. Just do only one anyway.
Text the following to 2910:
SSS REG (first name) (middle initial with period) (last name) / (birthdate MMDDYY) / (your SSS Number) and send to 2910
Example: SSS REG John A. Lopez/108768/357889665
OR
Text the following to 2600:
SSS REG (SSS Number) (date of birth mm/dd/yy (first name) (last name) and Send to 2600
Example: SSS REG 357889665 08/16/85 John Lopez
Upon successful registration, you will receive a text message informing you with your unique system-generated PIN code which is required to all SMS transactions and services. It’s important you know this PIN code.
Step 2: How to check SSS contribution by texting? And how much will it cost? It only costs P2.50 per text if you’re using Globe and P2.00 for Smart and Sun Cellular subscribers. To check your social security contributions, loan application status and loan balance, you can do this in 2 ways, too.

Text 2910:

Total Contribution: SSS TC (SSNUM) (PIN)
Loan Status: SSS LS (SSNUM) (PIN)
Loan Balance: SSS LB (SSNUM) (PIN)

Text 2600:

Contribution: Text SSS CONTRIB (SSNUM) (PIN)
Loan Status: Text SSS LOANSTAT (SSNUM) (PIN)
Loan Balance: Text SSS LOANBAL (SSNUM) (PIN)
Related articles:

Disclaimer: I'm not connected or affiliated with the SSS. Just shared this page for everyone because I find the SSS Online Inquiry system so helpful. Please only exchange tips and experiences in the comments.

Window to Cut Hole on Thick Wall


window-thick-wall-thumb
In an earlier tutorial this week, we demonstrated how to create a basic window (or in fact any component) that can cut a hole on a face. The drawback of a single component is that it can only cut a hole on a single face and walls for instance modelled with real world thickness, have two faces.
In this tutorial, we demonstrate how to create a component (more exactly a complex component) that can cut the holes on both the outer and inner faces of such a wall.

The Initial Component 

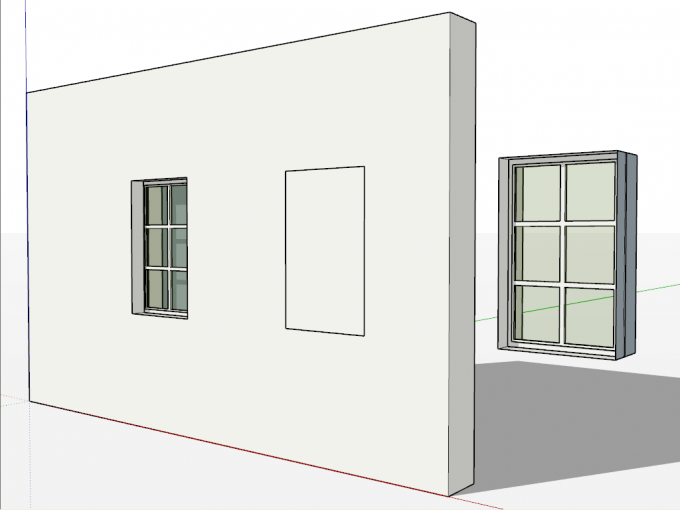
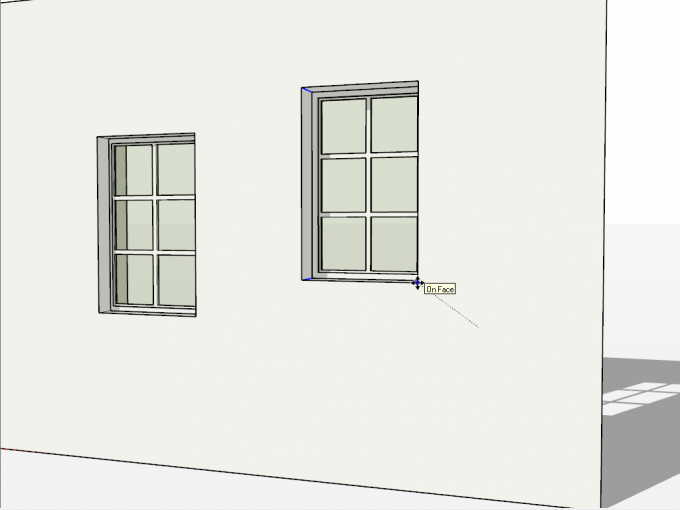
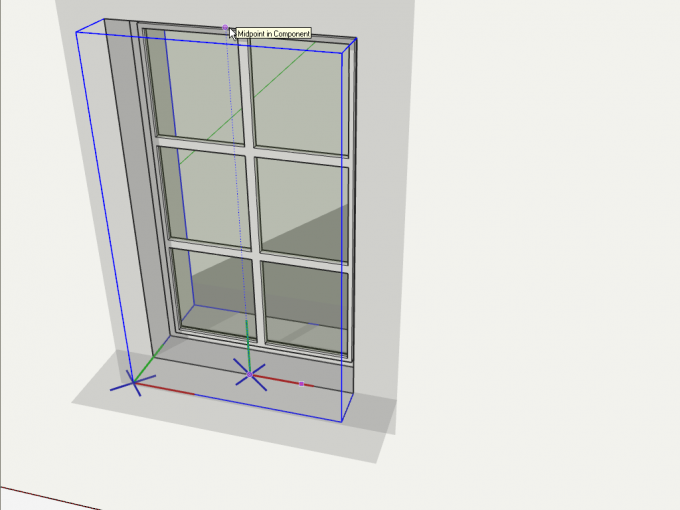
As we cannot change how SketchUp works, of course, we need to figure out some workarounds. In the image below, I already start with a basic window component that has the ability to cut a hole into a face. Only the window glass is textured for better visibility of the issues.
1-the-main-component
On the lesft, there is the window component inserted from this side of the wall. In the middle, it is inserted from the other side and you can see its edges bleeding through the face but that it does not cut a hole. On the right, it is hung in the air so that you can see what it would look like. Its "depth" is set exactly the same as that of the wall (this is a prerequisite).

Transparent Back Face Material 

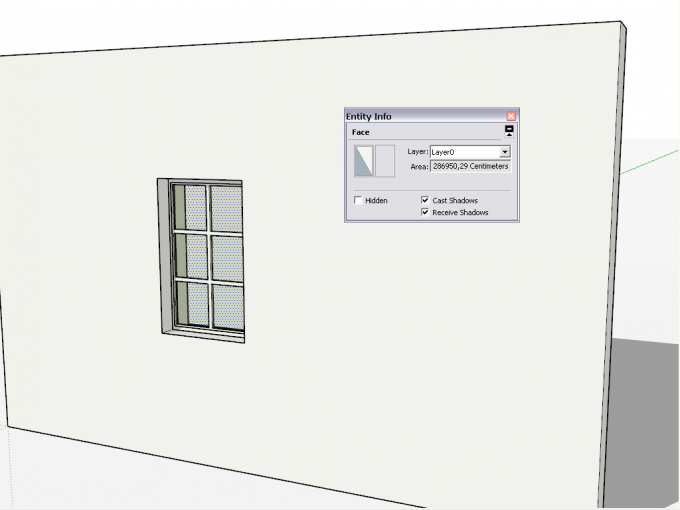
A very quick and dirty method can be to paint the back face material of the inner face of the wall with a completely transparent material. From now on, we can see through that face from outside and if we do not need more complex scenes or models (i.e. if a room only has windows on one of its single walls and we do not want to export images from the room itself), it can be an easy way to achieve a "pseudo-cutting component".
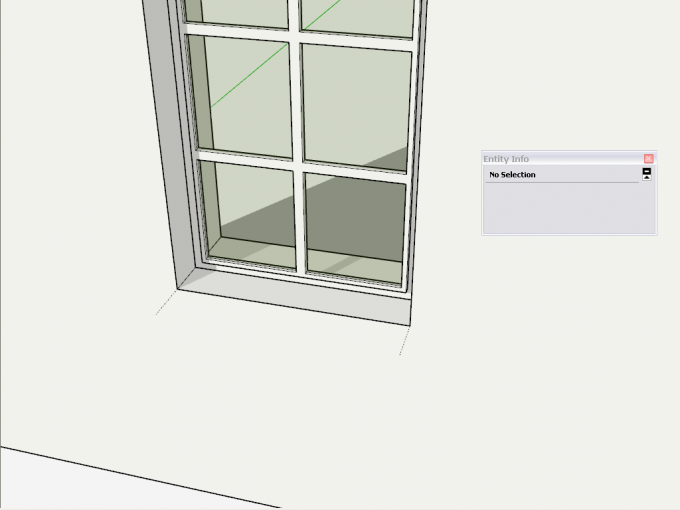
2-transparent-back-face
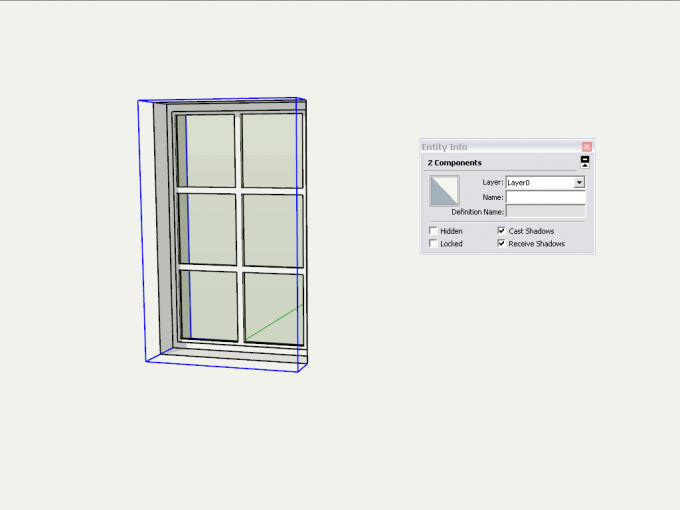
In the image above, the back face of the wall is selected (you can see the selection dots through the window). In the entity info box, the left thumbnail is for its front face (pointing away from the camera in this screenshot) and the right thumbnail shows the transparent back face.
In this little teaser video I made some time ago, you can see such a component in action. As you can see, I was trying to avoid showing the windows from inside as it would have revealed the trick.

Adding Another Component 

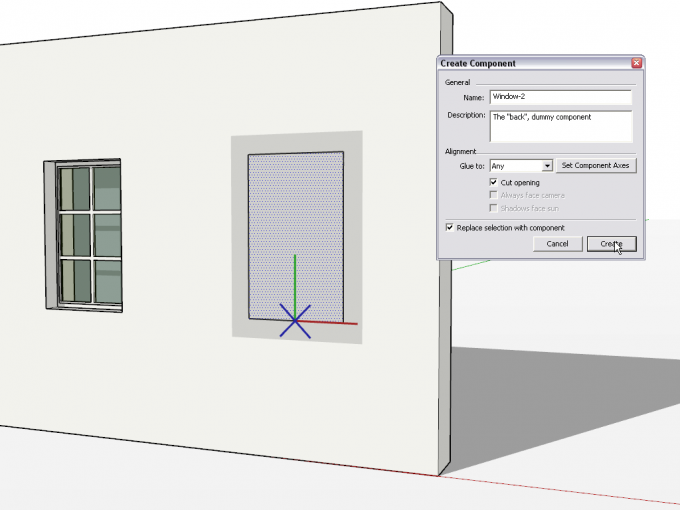
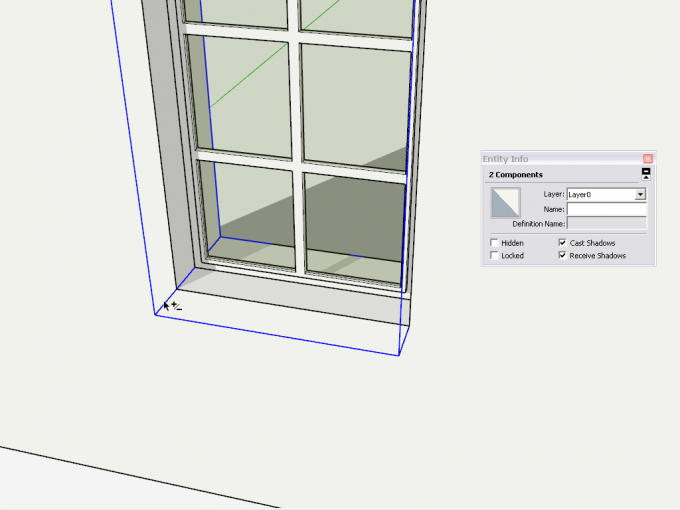
If we want to do it the "right way" however, we should consider some better methods. Below I drew a rectangle to fit the "back" of my component exactly, double clicked and turned it into a component that cuts another hole on the back side now.
3-back-component
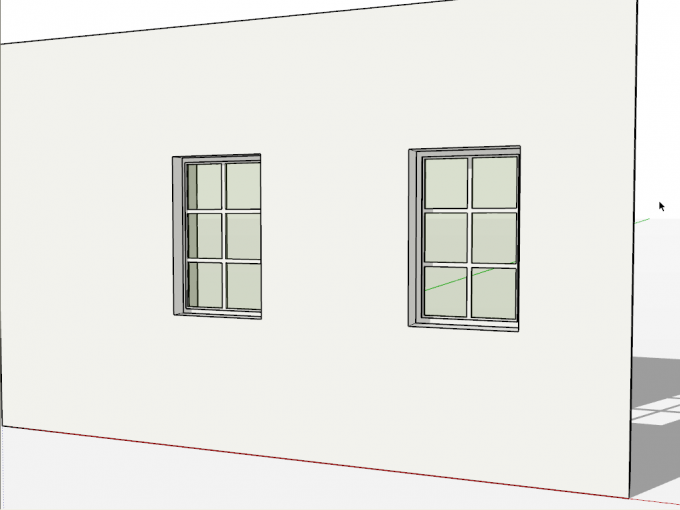
If you edit this new component and delete its face leaving its edges (completely co-linear with the back edges of the front component), you will end up with something now already cutting your other face, too.
4-two-components
If you select both components together (in this simple scene, it is quite easy to select both with a left-to-right selection), you can also easily move them together. 
5-move-together
Now of course the problem arises when your scene is more complex and you may incidentally select something behind the wall this way, too, and then move it around along with the components. We need to find out a trick that enables us to select both components easily.

Adding Some Dummy Geometry 

For the below trick, credits go to Gerrit Hubers (aka Wo3Dan on the forums). You can add some dummy geometry (either on a hidden layer or hidden geometry itself) to both window components. These pieces of geometry should be accessible on the same side (here "outside") of the wall. 
6-hidden-lines
By clicking them with the Shift key pressed, you can easily select boith safely and move them around as you wish.
7-components-selected

Nesting the Two Components 

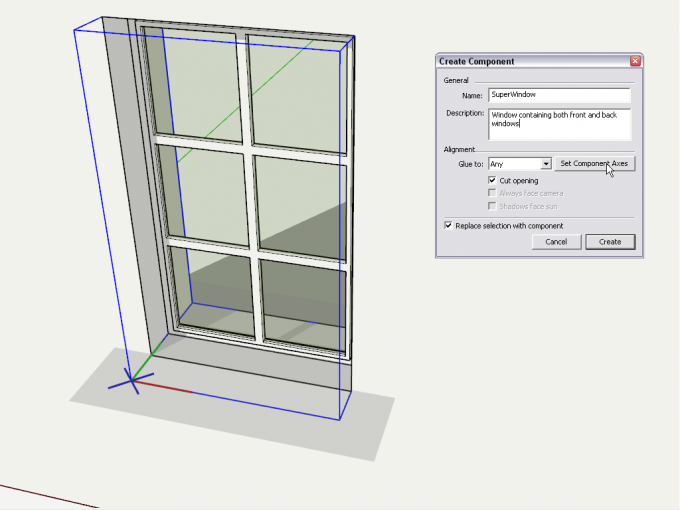
We can of course go further and make a nested component of the two. There will be some smaller issues but if you can adjust them to your workflow, they can be overcome.  Once both components are selected, right click on them and make a "parent component". Set it to glue, cut a hole and first of all, make sure that "Replace selection with component" is checked (it will not be by default).
8-make-supercomponent
Now there is some problem however on the above image. The component axes do not nicely align with the face they should cut the hole but differently. Before pressing the "Create button", make sure to set the component axes. For this most important step, credits go to Susan Sorger (aka sorgesu on the forums)
9-setting-component-axes

  1. First click to where you wish to establish the component origin (make sure it's on the edge or our previuos component - i.e. also on the face we are cutting)
  2. Next pull the red axis along this bottom edge
  3. Finally pull the green axis to snap to the edge of the first component - again, on the face we want to cut.
Now you can create your component. At this point it will lose its cutting feature on the instance you have been creating it. You can delete this and insert a new component from the Component browser.
10-supercomponent-inserted
Now seemingly we are still not at it as our current parent component (by SketchUp default) can also only cut a single face and the back face of the wall is not cut again. But if you explode this parent component (at a stage of your modelling work when it is not likely you want to move it anywhere), both child components will regain their cutting features like below. 
11-supercomponent-exploded
If additionally (and temporarily) you also use the transparent back face method until you explode the parent component, you will have the ability to see through unti then as well. Also, if you keep the dummy geometry in both components, in a late phase of your modelling, after you have already exploded the parent component, you can still move the two around. Lots of choices.

Hole Punching Tool 

Additionally to the above, sometimes a bit convoluted methods, our plugin guru, TIG has developed a plugin, "Hole Punching Tool" that can punch a hole on the opposite side of the wall (also adding an extrusion to the component to compensate for the difference between the wall thickness and the component depth). Some more observations on this plugin and the tips and tricks on using it with complex plugins will be the subject of another tutorial soon.

How to install Plugins in SketchUp


installing sketchup plugins
In this guide you will find every possible method for installing plugins in SketchUp and what you need to make it as trouble free as possible.
If you are new to Sketchup and you have just begun to explore to vast world of plugins then this is the ideal introduction.
This tutorial is aimed at Beginner SketchUp Users who are familiar with using various archiving apps and digging about their computers innards.


The Complete Guide to SketchUp Plugins for Beginners
Whether it's our very own community driven Plugin Index, Didier Bur's Ruby Depot or Smustard you have an awesome plethora of plugins to choose from. Installing these for the first time can be a little tricky for new users. Sometimes it can be frustrating when things are not clear from the outset.
From rbz to zip we detail every step you need to know to get SketchUp tailored to your needs.


Installing RBZ files in SketchUp

Since the release of SketchUp 8 M2 the clever folks at SketchUp made installing plugins a one click operation. They introduced a new file format (.rbz) which means that you can install plugins from within SketchUp itself.
Under the Window menu select Preferences to display the following dialog box...
extension manager location
Selecting Extensions from the sidebar lists all the active and inactive plugins currently installed.
Clicking Install Extension... allows you to navigate to the .rbz file you downloaded.
A warning dialog asks to confirm that you want to install this plugin and that you are aware that it makes changes to your file system. No real need to worry here if you downloaded the file from a reputable source.
install warning pop-up
The final dialog box confirms the installation is successful.
installing-plugins-5
That is a pretty painless means of installing scripts but the adoption of the RBZ format is not yet widespread. Later we will look at making other non RBZ plugins into .rbz files.


Installing RB files in SketchUp

The .rb format has long been the staple method of delivering SketchUp Plugins. It is a simple text file written in the ruby language that is saved as a ruby file. These can come in varying complexity. Some are simply a single file which will add a menu item. While others contain folders with multiple files that are delivered in the zip format that may add toolbar functionality and all sorts of goodies. We will look at how to manually install these into SketchUp.
installing-plugins-6

Whether you are a PC or Mac use you will first need to locate where the SketchUp Plugins folder on your sysem is.
On Microsoft Windows it is located here -
C:\Program Files (x86)\Google\Google SketchUp 8\Plugins
On Mac OSX it is located here -
/Library/Application Support/Google SketchUp 8/SketchUp/Plugins
Mac users need to pay particular attention here as it is a common misconception that the plugins folder is located with the SketchUp package.
With our plugins folder identified installing a plugin is a simple drag and drop procedure from your default browser download folder location to the SketchUp Plugins folder. If SketchUp is already running you will need to restart it for the plugin to appear.

Error “The WebDAV server extension is either not installed or not configured properly” in Configuration Manager 2007

We have seen couple of cases on this issue here in product support recently and since I didn't see the information documented on our site anywhere I thought it would be worth a mention here.

Issue:

The SMS Site Component Manager fails to install the SMS_MP_CONTROL_MANAGER component on the on server. The error is as follows:

Quote
The WebDAV server extension is either not installed or not configured properly.
Solution: Make sure WebDAV is installed and enabled. Make sure there is an authoring rule that allow “All users” read access to “All content”. Make sure the WebDAV settings “Allow anonymous property queries” and “Allow property queries with infinite depth” are set to “true” and “Allow Custom Properties” is set to false.

If you go to the IIS management console, connect to the local server and open the “WebDAV Authoring Rules” option you will find everything enabled but it still doesn't seem to recognize it.

Cause:

This can occur if the settings for the WebDAV Authoring Rules become out of sync with the WebDAV_schema.xml file.

Resolution:

We need to go the location of the configuration file of Webdav which is C:\Windows\System32\inetsrv\config\schema\WebDAV_schema.xml. After opening this file you may notice that the settings in this file were different from the settings that were configured in the IIS Manager. The settings were configured as:

<attribute name=”allowAnonymousPropfind” type=”bool” defaultValue=”false” />
<attribute name=”allowInfinitePropfindDepth” type=”bool” defaultValue=”false” />
<attribute name=”allowCustomProperties” type=”bool” defaultValue=”true” />


However they should be:

<attribute name=”allowAnonymousPropfind” type=”bool” defaultValue=”true” />
<attribute name=”allowInfinitePropfindDepth” type=”bool” defaultValue=”true” />
<attribute name=”allowCustomProperties” type=”bool” defaultValue=”false” />


After correcting these settings (remember we have to take ownership of the file to be able to change it) and restarting the World Wide Web Publishing Service and the SMS_SITE_COMPONENT_MANAGER the Management Point should install correctly. You can check if the installation is successful in the log file MPSetup.log in your SCCM\Logs directory. If successful the log should have entries similar to this:


<04-01-2010 13:15:58> ======== Completed Installion of Pre Reqs for Role SMSMP ========
<04-01-2010 13:15:58> Installing the SMSMP
<04-01-2010 13:15:58> Passed OS version check.
<04-01-2010 13:15:58> IIS Service is installed.
<04-01-2010 13:15:58> checking WebDAV configuraitons
<04-01-2010 13:15:58> WebDAV is configured
<04-01-2010 13:15:58> No versions of SMSMP are installed. Installing new SMSMP.
<04-01-2010 13:15:58> Enabling MSI logging. mp.msi will log to E:\SCCM\logs\mpMSI.log
<04-01-2010 13:15:58> Installing E:\SCCM\bin\i386\mp.msi CCMINSTALLDIR="E:\SMS_CCM" CCMSERVERDATAROOT="E:\SCCM" USESMSPORTS=TRUE SMSPORTS=80 USESMSSSLPORTS=TRUE SMSSSLPORTS=443 USESMSSSL=TRUE SMSSSLSTATE=0 CCMENABLELOGGING=TRUE CCMLOGLEVEL=1 CCMLOGMAXSIZE=1000000 CCMLOGMAXHISTORY=1
<04-01-2010 13:16:32> mp.msi exited with return code: 0
<04-01-2010 13:16:32> Verifying CCM_CLIENT virtual directory.
<04-01-2010 13:16:32> Website path is IIS://LocalHost/W3SVC/1.
<04-01-2010 13:16:32> Connecting to IIS.
<04-01-2010 13:16:32> CCM_CLIENT is currently E:\SCCM\Client.
<04-01-2010 13:16:32> Installation was successful.

Note: As you do any time you modify an XML file, please make a backup of WebDAV_schema.xml before making changes to it.

Hope this helps!

Ankur Srivastava

    how to update SCCM 2007 to SCCM 2007 SP1

    This guide was done on a Windows 2003 Server (sp2) running SCCM 2007 which in turn was upgraded from SMS 2003.

    As a result, your results may vary, if they do, post them here.


    Part 1. Run the Pre-requisite checks and fix the warnings/errors reported.


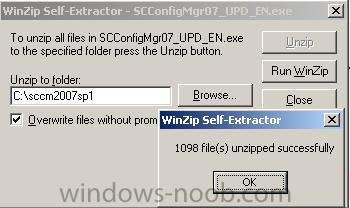
    First of all download the Service Pack 1 update and then run the EXE file which will unzip it to a folder of your choice (I chose to call the folder sccm2007sp1)

    unzip.JPG 

    Once unzipped you can burn that to a DVD or run the splash.hta file contained in C:\sccm2007sp1\SCConfigMgr07_UPD_EN

    Once it starts you can run the prerequisite checker to see what you need to fix before continuing...

    pre_req.JPG 

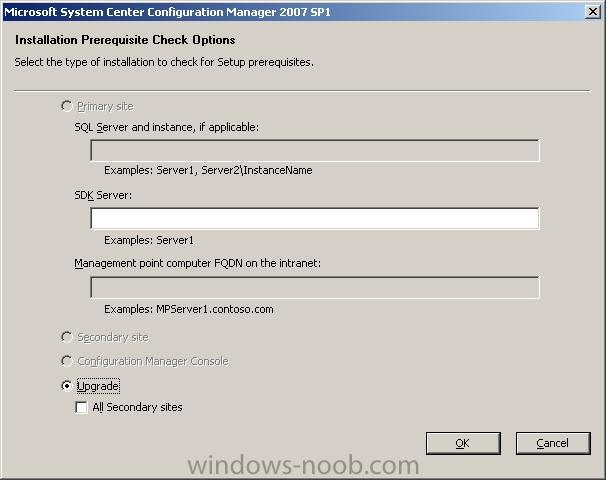
    you will be presented with a prerequisite check

    prereqcheck.JPG 

    I left everything as it was and clicked on OK

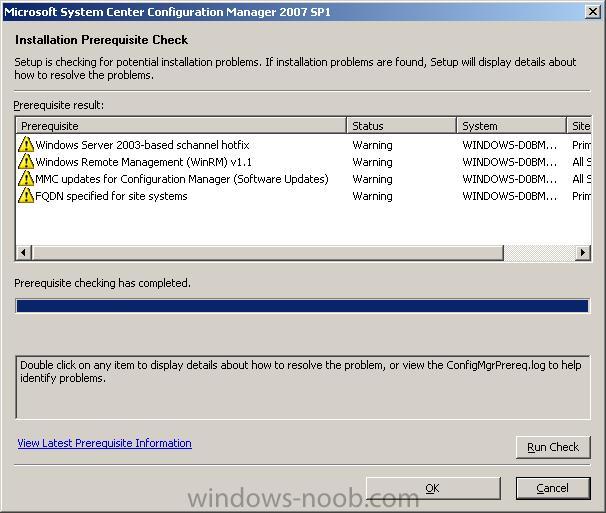
    once done you'll get a list of errors that need to be resolved such as below, double click on any one to see what the recommended action is and then action each one

    prereq_errors.JPG 

    My first error told me that I needed to do as follows:
    Quote
    Configuration Manager out of band service point requires Windows Server 2003-based schannel hotfix. The schannel hotfix is available for download at:http://support.micro...kb/942841/en-us.

    as this was a hotfix i was pleasantly surprised to see that Microsoft now allow you to download the hotfix semi-directly, you have to enter your email address twice and input a number displayed on screen, you then get an email with the hotfix download details...

    So I downloaded the first one and extracted it with the password supplied in the email.

    hotfixkb942841.JPG

    While the hotfix installed I clicked OK on the prerequisite checker for SCCM 2007 sp1.

    Once the hotfix was done installing, it wanted a reboot, so I rebooted. And then I ran the SCCM 2007 SP1 prerequisite checker again by starting at the beginning and running splash.hta...

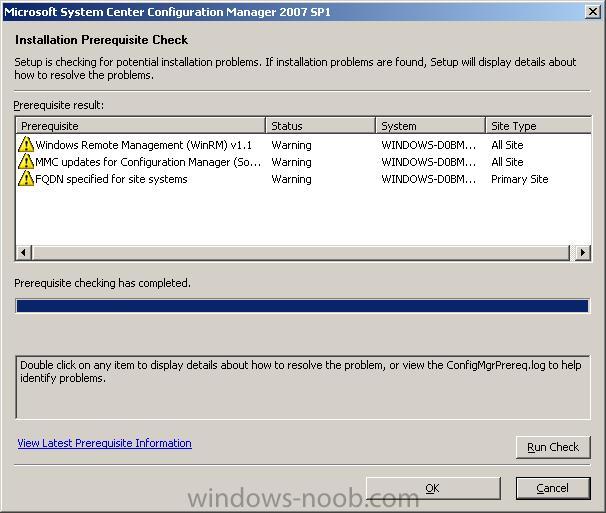
    This time however I was down to only 3 warnings :)

    3left.JPG


    Next up I had to do the following:-
    Quote
    WinRM v1.1 is required to run the out of band console and must be installed before primary site or Configuration Manager console installations or upgrades. WinRM 1.1 is available for download at: http://support.micro...com/kb/KB936059.

    That brought up a page with 3 download links (xp/windows server and so on).... confusing, inconsistent ? yep.. but I got the following file


    WindowsServer2003-KB936059-x86-ENU.exe


    I must have been lucky because when I ran the SCCM sp1 prerequisite checker again, I was only shown 2 warnings (below)

    2left.JPG

    Next up was my MMC update
    Quote
    This software update addresses several MMC errors that may occur when running the Configuration Manager console. This update should be applied if any of the following occur: Configuration Manager console stops responding when the host computer is low on available memory, context menu errors on console home pages, or inconsistent display after drag-and-drop operations do not succeed. More information about this update is available at: http://go.microsoft....k/?LinkId=98349.

    Once installed, I ran the SCCM 2007 SP1 pre requisite checker again, it told me i still needed this fix, so I decided to reboot (the hotfix didn't request it), the reboot didn't help it still listed it as a warning...

    so I viewed the ConfigMgrPrereq.log file (stored in the root of C:\) and it had a line that read

    Failed to connect to registry for KB940848 with 203 that lead me to this post

    Using regmon from Sysinternals I found the missing key and made a reg file of it, if you want it make sure you've applied the correct hotfix first then:-

    As a workaround I've produced the following hack.

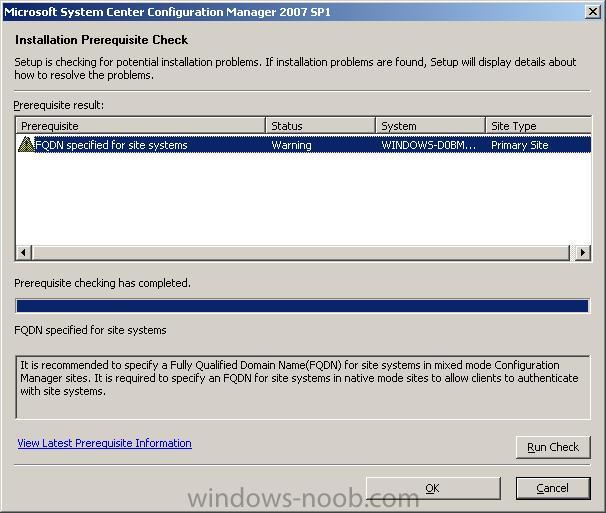
    FQDN Warning.

    fqdn.JPG
    Quote
    It is recommended to specify a Fully Qualified Domain Name(FQDN) for site systems in mixed mode Configuration Manager sites. It is required to specify an FQDN for site systems in native mode sites to allow clients to authenticate with site systems.

    As my SCCM 2007 site is mixed mode I chose to resolve this warning by doing as follows:-

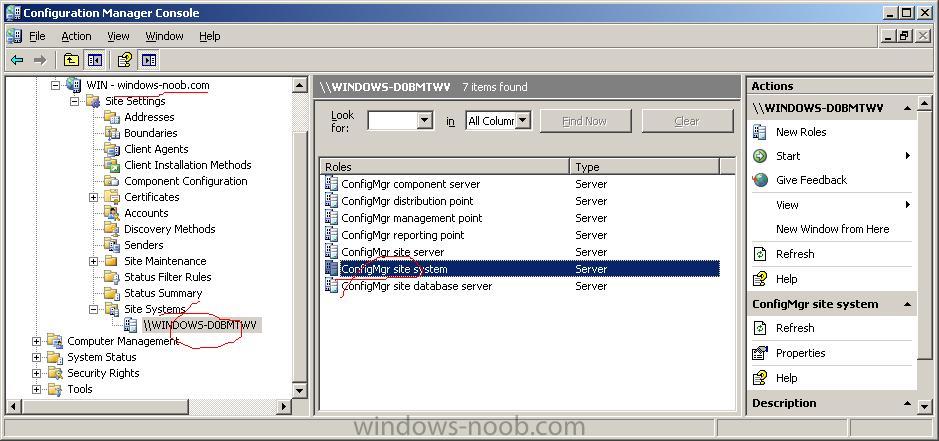
    To fix the FQDN error try the following:


    1. Start SCCM Console

    2. Click Site Database

    3. Click Site Management

    4. Click on Site

    5. Click Site Settings

    6. Go to Site Systems

    7. Click on SCCM Server (where State Migration Point is located)

    8. Right click on “Configmgr Site System”

    fqdn_sccm.JPG

    9. Click on Properties

    10. In the "Specify a fully qualified domain name (FQDN) for this site system on the intranet” change the Intranet FQDN to something like my example here

    it was WINDOWS-DOBMTWV

    I changed it to windows-noob.sccm2007.local and clicked apply,

    fqdn_changed.JPG

    after waiting a few minutes for SCCM 2007 to udpate itself I ran the pre-req checker again and finally, success !

    pre_req_success.JPG